
How To Set The Print Area In Excel
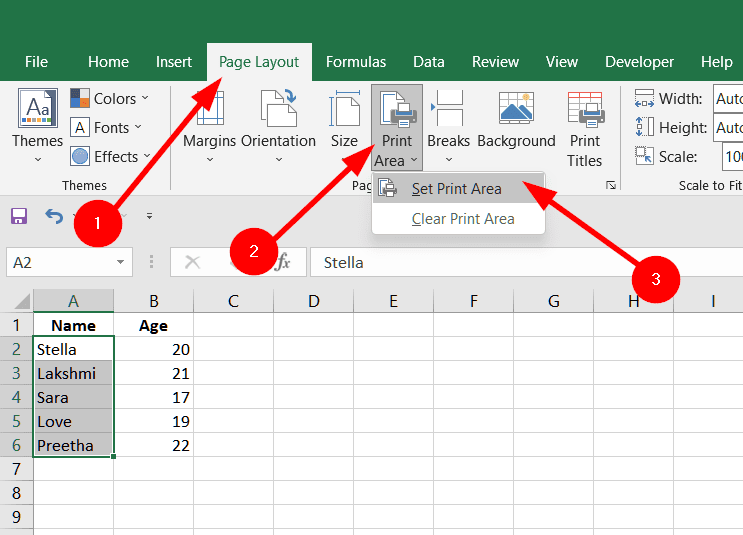
How To Set The Print Area In Excel - Unable to set print area. Select the cell range to print. Use the name manager to edit and delete print areas. Click the print area button. Select page layout from the top menu.
Excel tutorials by easyclick academy. More informative way to define print area in excel As a result, the selected cells will be set as the print area. Highlight the cells you want to print by. We can use the print area option from the page layout tab to create the required print areas in a worksheet. Web press the keyboard shortcut “ ctrl+shift+p ” to open the “print area” menu. Web in this excel tutorial, you'll learn how to set the print area in excel to print only the part of the spreadsheet that you need.
:max_bytes(150000):strip_icc()/ExcelSetPrintArea-5c23d199c9e77c0001adc722.jpg)
How to Set Print Area in Excel
Web fastest way to set print area in excel. Select page layout from the top menu. Now when you print this worksheet, only the set print area would be printed. Firstly, select the cells which we want to set as the print area for page 1. It is called page break view in excel. Go.

How to View the Print Area in Excel 2010 Solve Your Tech
A dark gray border appears around the print area. Web fastest way to set print area in excel. It also creates a named range for the selected area (the name print_area would be visible in the name box). Web in this excel tutorial, you'll learn how to set the print area in excel to print.

How to Set Print Area in Excel (5 Methods) ExcelDemy
The print area button in the page setup block of the page layout tab is the default tool for setting a print area in excel. Now, press alt + p + r + s to create the print area. Head to the page layout in the page setup section, click on the print. Hold down.

Print Area in Excel Tutorial YouTube
Click the print area button. To set multiple print areas, hold down the ctrl key and click the areas you want to print. Click “ set print area ” to designate the selected cells as the print area. Select your desired print area —> page layout tab —> print area —> set print area. Click.
How to Set the Print Area in MS Excel OfficeBeginner
Using set print area option to print multiple pages in excel. Select page layout from the top menu. Firstly, select the cells which we want to set as the print area for page 1. Once a print area is set, add additional print areas by selecting the additional cells, clicking the print area button, and.
:max_bytes(150000):strip_icc()/ExcelPageBreakPreview-5c1c28c8c9e77c00017a2ade.jpg)
How to Set Print Area in Excel
Web press the keyboard shortcut “ ctrl+shift+p ” to open the “print area” menu. On the file tab, click print. Each print area prints on its own page. Finally, click “ print ” to print the designated area. Excel tutorials by easyclick academy. The quickest way to set a constant print range is this: As.

How to set print area in excel
This would set the selected cells as the print area. Web to set the print area, you select the area and hit the set print area command; Each print area prints on its own page. Web first, select the single or multiple cell range using the “control” key to set a print area in the.

How to set the print area in Excel IONOS
As a result, you can see the print area that you selected. On the page layout tab, in the page setup group, click print area. On the page layout tab, in the page setup group, click print area, and then click set print area. Hold down ctrl click the name of each workbook to print,.

How to Set Print Area in Excel (5 Methods) ExcelDemy
On the page layout tab, in the page setup group, click print area, and then click set print area. See the picture, this is where the end of the document is, you can see the long section below. As a result, you can see the print area that you selected. Now when you print this.

How to Set Print Area in Excel (5 Methods) ExcelDemy
Web first, select the single or multiple cell range using the “control” key to set a print area in the sheet. A dark gray border appears around the print area. Use set print area command to change print area in excel. Updated on july 11, 2022. Select file, and then click print. Choose set print.
How To Set The Print Area In Excel Select the area or cells on the worksheet that are to be printed. Each print area prints on its own page. Highlight a cell range you want to print exclusively on the paper sheet. The print area button in the page setup block of the page layout tab is the default tool for setting a print area in excel. On the page layout tab, in the page setup group, click print area, and then click set print area.
Web On The Worksheet, Select The Cells That You Want To Define As The Print Area.
How to adjust print area in excel. Hold ctrl while selecting areas > page layout > page setup > print area > select set print area. Web set print area in excel using print area command. Select page layout from the top menu.
I Cannot Move That Scroll Thing To Where I Would Like Because The Area Is Too Small Obviously.
See the print preview below. Select page break view and u will have the thick blue border with other cells grayed out as u mentioned. How to remove print area in excel. After that, go to print layout > print area and select set print area.
Click The Print Area Button.
In the ribbon go to view > page break preview. Updated on july 11, 2022. Afterward, go to the “page layout” tab and click the “print area” icon. Click the print area button.
Web Select File > Open.
Web to set a single print area, select the cells. First, select the cells which you want to set as the print area. How to set print area in excel. Click “ set print area ” to designate the selected cells as the print area.