
How Do You Set Print Area In Excel
How Do You Set Print Area In Excel - Print area in excel worksheets. Today we’ll be talking about how to set the. You can go to view menu on the ribbon and select one of the three options. It is called page break view in excel. Once you have opened the correct spreadsheet, find the area that you would like to print.
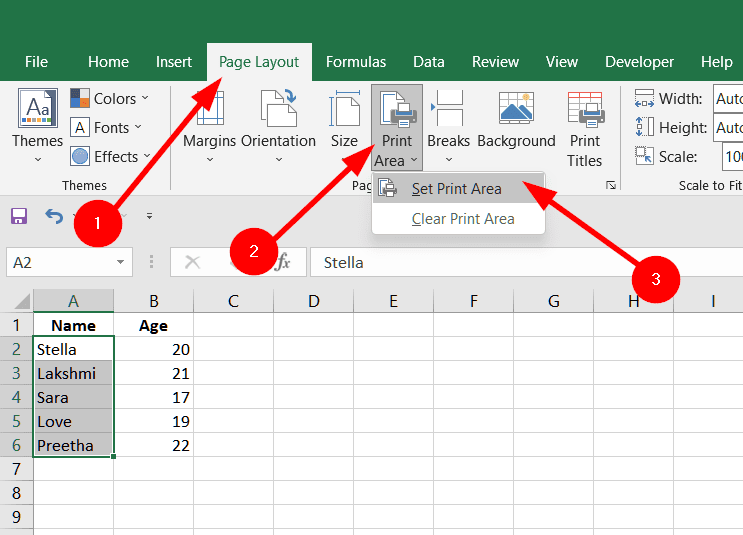
Click “ set print area ” to designate the selected cells as the print area. As a result, the selected cells will be set as the print area. Click the print area button. Highlight the cells you want to print by clicking on the first cell and holding down shift on your mac or. Select the cell range to print. More informative way to define print area in excel Select cells > go to page layout tab > page setup > print area > select set print area.

How to Set Print Area in Excel (5 Methods) ExcelDemy
Web we can use the set print area option from page setup view to set the print area. Web excel tutorials by easyclick academy. Only the print area will be printed. Secondly, go to page layout > select print area > choose set print area. On the file tab, click print. Highlight a cell range.

How to Set the Print Area in Microsoft Excel
Select the part of the worksheet that you want to print. Under printer, choose which printer to use. Web select page layout from the top menu. The quickest way to set a constant print range is this: The print area button in the page setup block of the page layout tab is the default tool.

How to set print area in Excel excelwrap
Web to set the print area, you select the area and hit the set print area command; Each print area prints on its own page. Hold ctrl while selecting areas > page layout > page setup > print area > select set print area. Save, close and reopen the excel file. Web press the keyboard.

Print Area in Excel Tutorial YouTube
Once a print area is set, add additional print areas by selecting the additional cells, clicking the print area button, and selecting add to print area. Hold ctrl while selecting areas > page layout > page setup > print area > select set print area. On the page layout tab, in the page setup group,.

How to set the print area in Excel IONOS
Web first, select the single or multiple cell range using the “control” key to set a print area in the sheet. Select cells to add > page layout > page setup > print area > add to print area. Web press the keyboard shortcut “ ctrl+shift+p ” to open the “print area” menu. Secondly, go.

How to Set Print Area in Excel (5 Methods) ExcelDemy
Web we can use the set print area option from page setup view to set the print area. Web excel tutorials by easyclick academy. After that, go to print layout > print area and select set print area. Web select page layout from the top menu. Select the part of the worksheet that you want.

How to Set Print Area in Excel (5 Methods) ExcelDemy
Click the print area button. Now, press alt + p + r + s to create the print area. It is called page break view in excel. Thirdly, choose the set print area option from the print area option. Go to the page layout tab. How to modify the print area in excel. If you.

How to print a large Excel spreadsheet Microsoft Excel undefined
If you have a large excel spreadsheet, you can press the “ctrl” key followed by the down arrow key to move to the bottom of the document. A dark gray border appears around the. To check the print area, click “ print preview ” in the “print” menu. A faint gray line will appear denoting.
How to Set the Print Area in MS Excel OfficeBeginner
As a result, the selected cells will be set as the print area. The specified excel keyboard shortcut will open the print tab in the file tab, showing the print preview, the print settings and the print option. Web select page layout from the top menu. If you have a large excel spreadsheet, you can.
:max_bytes(150000):strip_icc()/ExcelSetPrintArea-5c23d199c9e77c0001adc722.jpg)
How to Set Print Area in Excel
First, select the cells which you want to set as the print area. Web first, select the single or multiple cell range using the “control” key to set a print area in the sheet. More informative way to define print area in excel Click the print area button. In the print dropdown, click on the.
How Do You Set Print Area In Excel Finally, click “ print ” to print the designated area. Web we can use the set print area option from page setup view to set the print area. Web click the “print area” option on the page layout tab, and in the “page setup” section select “set print area.” keep in mind that the print area will be saved once you save the workbook. A dark gray border appears around the. 347k views 2 years ago #microsoftexceltutorial #excelquickandeasy #easyclickacademy.
Thirdly, Choose The Set Print Area Option From The Print Area Option.
To execute this, follow the steps below. Choose set print area. to set multiple print areas in your sheet, hold ctrl as you select each group of cells. You can go to view menu on the ribbon and select one of the three options. Select the part of the worksheet that you want to print.
Once You Have Opened The Correct Spreadsheet, Find The Area That You Would Like To Print.
Web excel tutorials by easyclick academy. Firstly, select the cells which we want to set as the print area for page 1. Click the print area button. Finally, click “ print ” to print the designated area.
Web Next, Press Ctrl + P To Print The Chosen Area.
Web set print area in excel using print area command. On the page layout tab, in the page setup group, click print area > set print area. Web we can use the set print area option from page setup view to set the print area. Save, close and reopen the excel file.
Here, We Have Selected Cells B4:D15 As The Print Area.
Under printer, choose which printer to use. Select page break view and u will have the thick blue border with other cells grayed out as u mentioned. Secondly, go to page layout > select print area > choose set print area. Afterward, go to the “page layout” tab and click the “print area” icon.